The Editor tab allows you to change general configuration fields for the template. For example, if you encounter errors during testing, you may need to change the file format or make other adjustments. You can also add/edit template owners or duplicate the template.
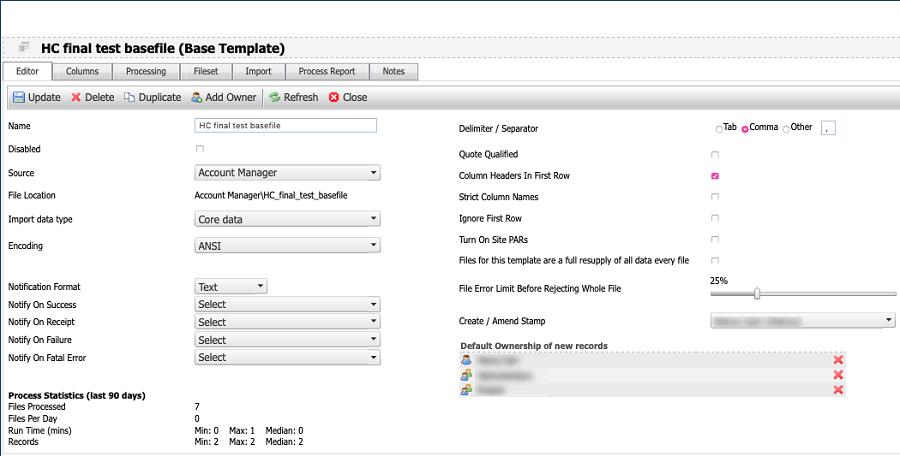
Editor fields
-
Name: The template’s name is used as the name of the directory on the FTP server into which files are uploaded. The FTP directory name may be provided to suppliers who upload data, so consider using a descriptive and unique naming convention for your templates.
Note: If you change the name of the template after the directory has been created, the directory name (and therefor the name you may have provided to suppliers) is not changed.
-
Import data type: This setting controls whether the template should create any transactions.
-
Core data - no transactions will be created.
-
Transaction data - one transaction will be created for each input row of the file, associated with the person in that row. In this case, the file must supply (and the template must map) at least a transaction name and a transaction date. This selection displays two more options:
- Transaction Class: The “Transaction Class” dropdown becomes visible, where you select the class of the transactions that will be created. Transaction Class also controls what other (“profile”) data can be associated with the transaction. This data can be assigned from the file via field mappings in the “Columns” tab.
- Transaction Type: The “Transaction Type” dropdown will be populated with the transaction types assigned to the selected transaction class. Select the default type of the transactions to be created. This setting can be overridden by the data in a column in the file that has been assigned the “Transaction Type” destination.
-
-
Encoding: This specifies the encoding used by the ETL process to read the file. The options are:
- Auto Detect – Only available when first importing a sample file to be processed. If the file is auto-detected as “ANSI”, you should double-check the encoding of the file before the actual import.
- Unicode (UTF-8) – UTF-8 is very common in webpages and online.
- Unicode - This is UTF-16 or, as it used to be called, UCS-2.
- Unicode (UTF-16, Big-endian) – This is a rare variant of UTF-16.
- ANSI – This is the Windows-1252 encoding, which is very common on Windows systems.
- ISO Latin 1 – This is the ISO 8859-1 encoding. It should never be used to import a file. Use ANSI instead.
-
Delimiter / separator: This defines the character that separates fields within a line of the input file. Tab-delimited and comma-delimited are both common data file formats, but any single character can be supplied as the delimiter. The ETL process does not currently handle multi-character delimiters.
-
Notifications: The notification options control how you are notified of various events. Select Text or HTML format, then select the group that is notified for each event.
-
Delimiter / separator: This defines the character that separates fields within a line of the input file. Tab-delimited and comma-delimited are both common data file formats, but any single character can be supplied as the delimiter. The ETL process does not currently handle multi-character delimiters.
-
Quote qualified: If there are fields in the data where quotation marks are used to enclose data that should be considered as a single value, select the Quote qualified option. When selected, the import process ignores any occurrence of the delimiter character that is enclosed by a pair of double quotation marks (").
-
Column headers in first row: If the first row of the data file includes column headings, select this option. When selected, the importer will assume that the first row of the file contains the names of the data fields, and will attempt to match up the columns in the file with the columns in the template, regardless of the order in which each occur.
If this is disabled, the importer assumes the first row is data, and proceeds to match file columns with template columns based on the order in which they occur.
-
File Error limit before rejecting whole file: During the import process, the importer will skip a row of data if it contains data that fails validation. This setting determines how many rows can be rejected due to errors before the entire process is halted. The threshold is specified as a percentage of the number of rows in the file, rather than a static number of rows, so that the limit remains relevant regardless of the size of the input file.
Any error with the “Reject Row” action counts towards the threshhold. Any other validation errors are not counted. Rows rejected by the Whitelist or Blacklist rules also do not count towards the error limit.
If the limit is reached, the ETL process halts immediately after reading in the file, and before making any changes to the database.
-
Create/Amend Stamp: The Create / Amend Stamp setting specifies which user is recorded as having created or amended the records inserted or updated by this template when it is run. It can be different from the user that created or last amended the template itself.
-
Ownerships: New records created by the template and existing records updated by it are all made visible to the teams and users listed in the bottom right of the “Editor” tab. By default, the only user able to see records created by a template is the user that created the template. That can be changed by adding other users and teams to the template, using the “Add Owner” button at the top of the “Editor” tab.
Add or edit template owner
When a template is created, ownership will default to the creator. If you need to assign ownership to another user or add additional owners, e.g. members of a team:
-
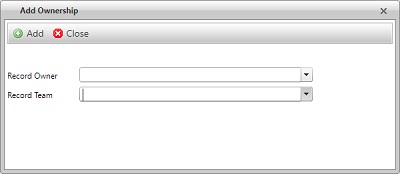
Click the add owner button in the taskbar to open the add ownership window.
-
Select a record owner and (optionally) a record team.
-
Click the add button to assign the new owner.
-
Continue adding owners as required.
-
When multiple owners are assigned, it is possible to remove unwanted owners, e.g. the creator of the template. Click the red X next to a user to remove them as an owner.

-
Click the update icon in the taskbar to save your changes.
Duplicate a data import template
-
Click the duplicate button in the taskbar.
-
Give the new template a name to differentiate it from other templates.
-
Click the create button. The new template will be created with the same column structure and sample data as the original.
Note: When a template is duplicated, the new template retains the create/amend stamp and ownership of the previous template. If required, select a different user for the create/amend stamp and edit the template ownership.